Large gap set-up
One of the most consistent tradeable set ups from TTs is the large gap set up. This has very high odds of playing out and allowing one to recognize the main trend of the day.
The basic rules of this set up are:
- a large gap (>20 points, but the larger the better), will almost always trigger a SE Xtick on the downside and a BE Xtick on the upside.
- the SE/BE becomes the LIS (line in the sand) for the trend on that particular day.
- if the SE/BE hold, that is likely going to mark the bottom/top of that particular day and the price will move towards gap fill and potentially beyond. Gap fill will always be an inflection area.
- if the SE/BE are broken through, then it’s likely a squeeze in the same direction as the gap will happen (continuation squeeze)
- danny gives the immediate trend and, if the day is more choppy and slow, then the 400bar MA will “act as danny”. Once those fail as support/resistance, the immediate trend is broken and a reversal can happen.
You can see from the examples I gathered how price is behaving to such an opening BE/SE. Normally it holds cleanly or it’s broken cleanly. If the opening BE/SE generates a reaction in the opposite direction, it’s important to look at danny/400bar MA to see if the reversal to the gap fill can happen.
So the main advantage of a large gap day is that the opening BE/SE will tell you what the trend for that day is. And as long as danny holds in that direction, that is the immediate trend. Trading in that direction will give you an edge.
The concrete way to trade an opening gap is (example on gap down, gap up works the same but in the opposite direction):
- buy an opening SE Xtick once it confirms, with stop around 3 points below to avoid a shake-out
- entry can be either on confirmation, or on reversal candle on 1m, or draw a TL (trend line) on the price action leading into that SE and once it’s broken buy. In case this entry strategy is used, stop can be put 1 point below the low.
- if the SE Xtick gets broken, you need to flip short. breakdown needs to stick, meaning either it’s sliced through directly or if it makes a low below it and bounces, needs to hold the back-test. danny is important if it’s close by.
- once the trend is established, either that the SE holds (trend is up) or the SE is broken (trend is down), trade ONLY in the direction of the trend by buying dips or selling rips. Tests of danny or 400bar MA or new SE/BEs can be used as additional entries.
- the initial entry off the SE hold/break should be held and only move stops on oppossing signals. Partial profits are fine, but always hold at least a runner, as you can see mkt can run a LOT.
- do NOT attempt to anticipate a turn, until danny gets broken. Once it does, then trend reversal is likely and will be confirmed once 400bar MA is also broken (if it’s close-by). If it’s far away, then danny break is enough. Danny needs to NOT be lost again or it’s a head-fake.
Example 1
Here you can see a gap up, which triggered an opening BE Xtick. Price whipsawed violently for the initial period, with danny holding on the downside and attempted breakout, which failed quickly. then price pushed below danny and bears almost took it home by breaking 400bar MA, but they lost the battle there. Bulls recovered 400bar MA quickly, then won danny back and tried to breakout above the BE. Price whipsawed more just near the BE Xtick, we saw 2 SEs show up, but in the end danny held and we pushed higher. In order for bears to have won they needed to hold the BE Xtick lvl and break below danny AND 400bar MA.
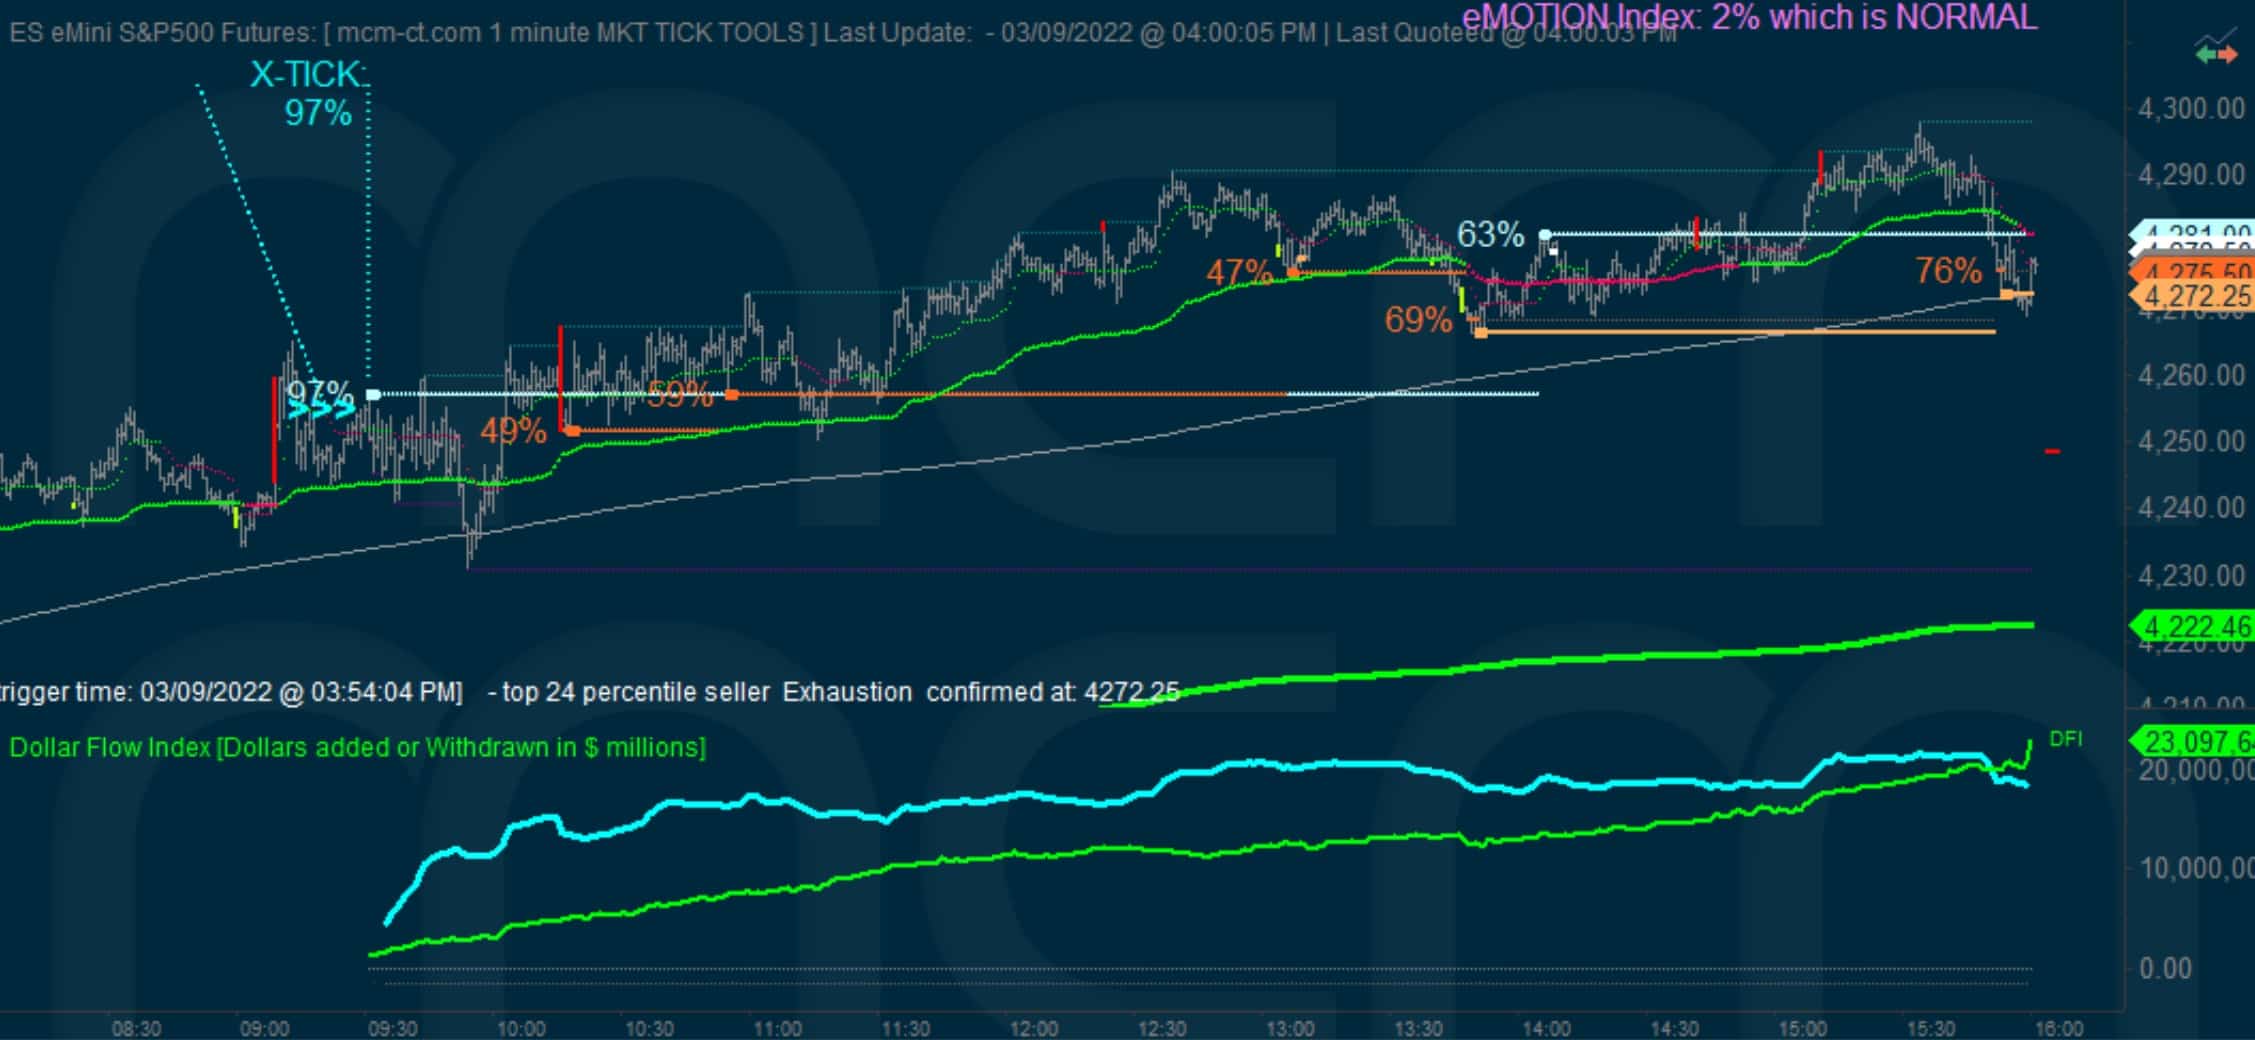
Example 2
Here we see an easier opening BE, as price already started to come lower in the o/n prior to the open. Opening BE Xtick held cleanly (danny was above it and red and also 400bar MA was close and was lost quickly after the open). Price went to ML quickly after that, then broke ML where 2 SEs triggered. that triggered a bounce back into danny, but danny rejected price and we moved lower. Then danny basically capped price all day, with brief pushes above it that quickly fizzled and failed-. We ended the day almost 90 points (!) lower from the open.
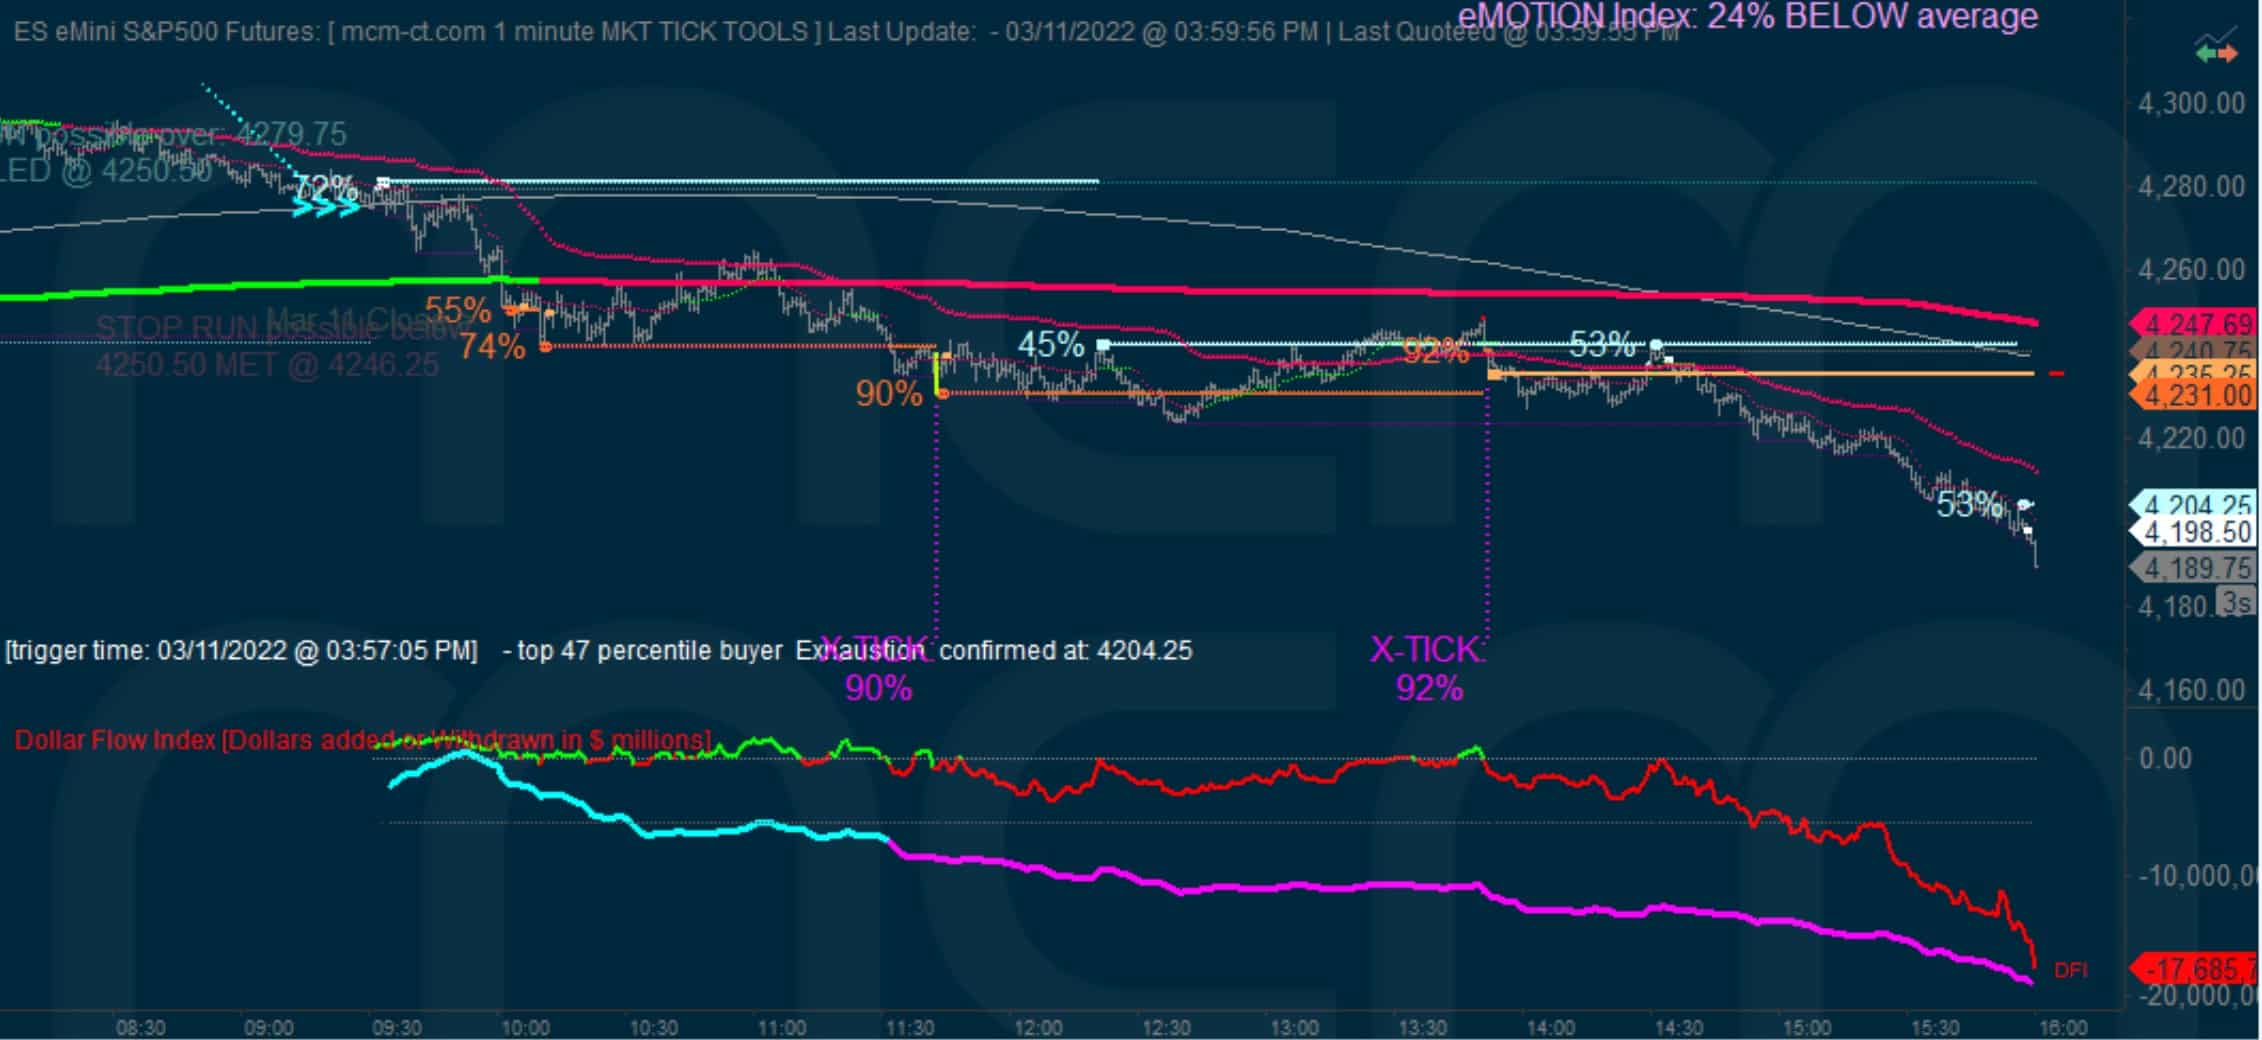
Example 3
This example shows a wild roller-coaster ride. The opening BE Xtick was broken directly, we pushed higher, then had a nice back-test with a SE at 400bar MA test too. Perfect entry long. Then we spiked higher almost 30 points from there, before the bounce started to fizzle out. The 1st warning for bulls was that danny didn't hold as support. Price sliced through it, then started to whipsaw it. The 57% SE provided a good chance for bulls, but they failed quickly after getting above danny... once they lost danny after that SE, it was clear they lost the battle and we flushed. After losing the opening BE Xtick all hell broke loose and we dropped 50+ points into a double SE Xtick. The last SE Xtick at 4260 had a failed breakdown, and once bulls recovered that lvl, they staged a massive rally. The big battle was once again at the opening BE Xtick lvl (and 400bar MA), once bulls won that lvl again, it was off to the races and the just squeezed into the close.

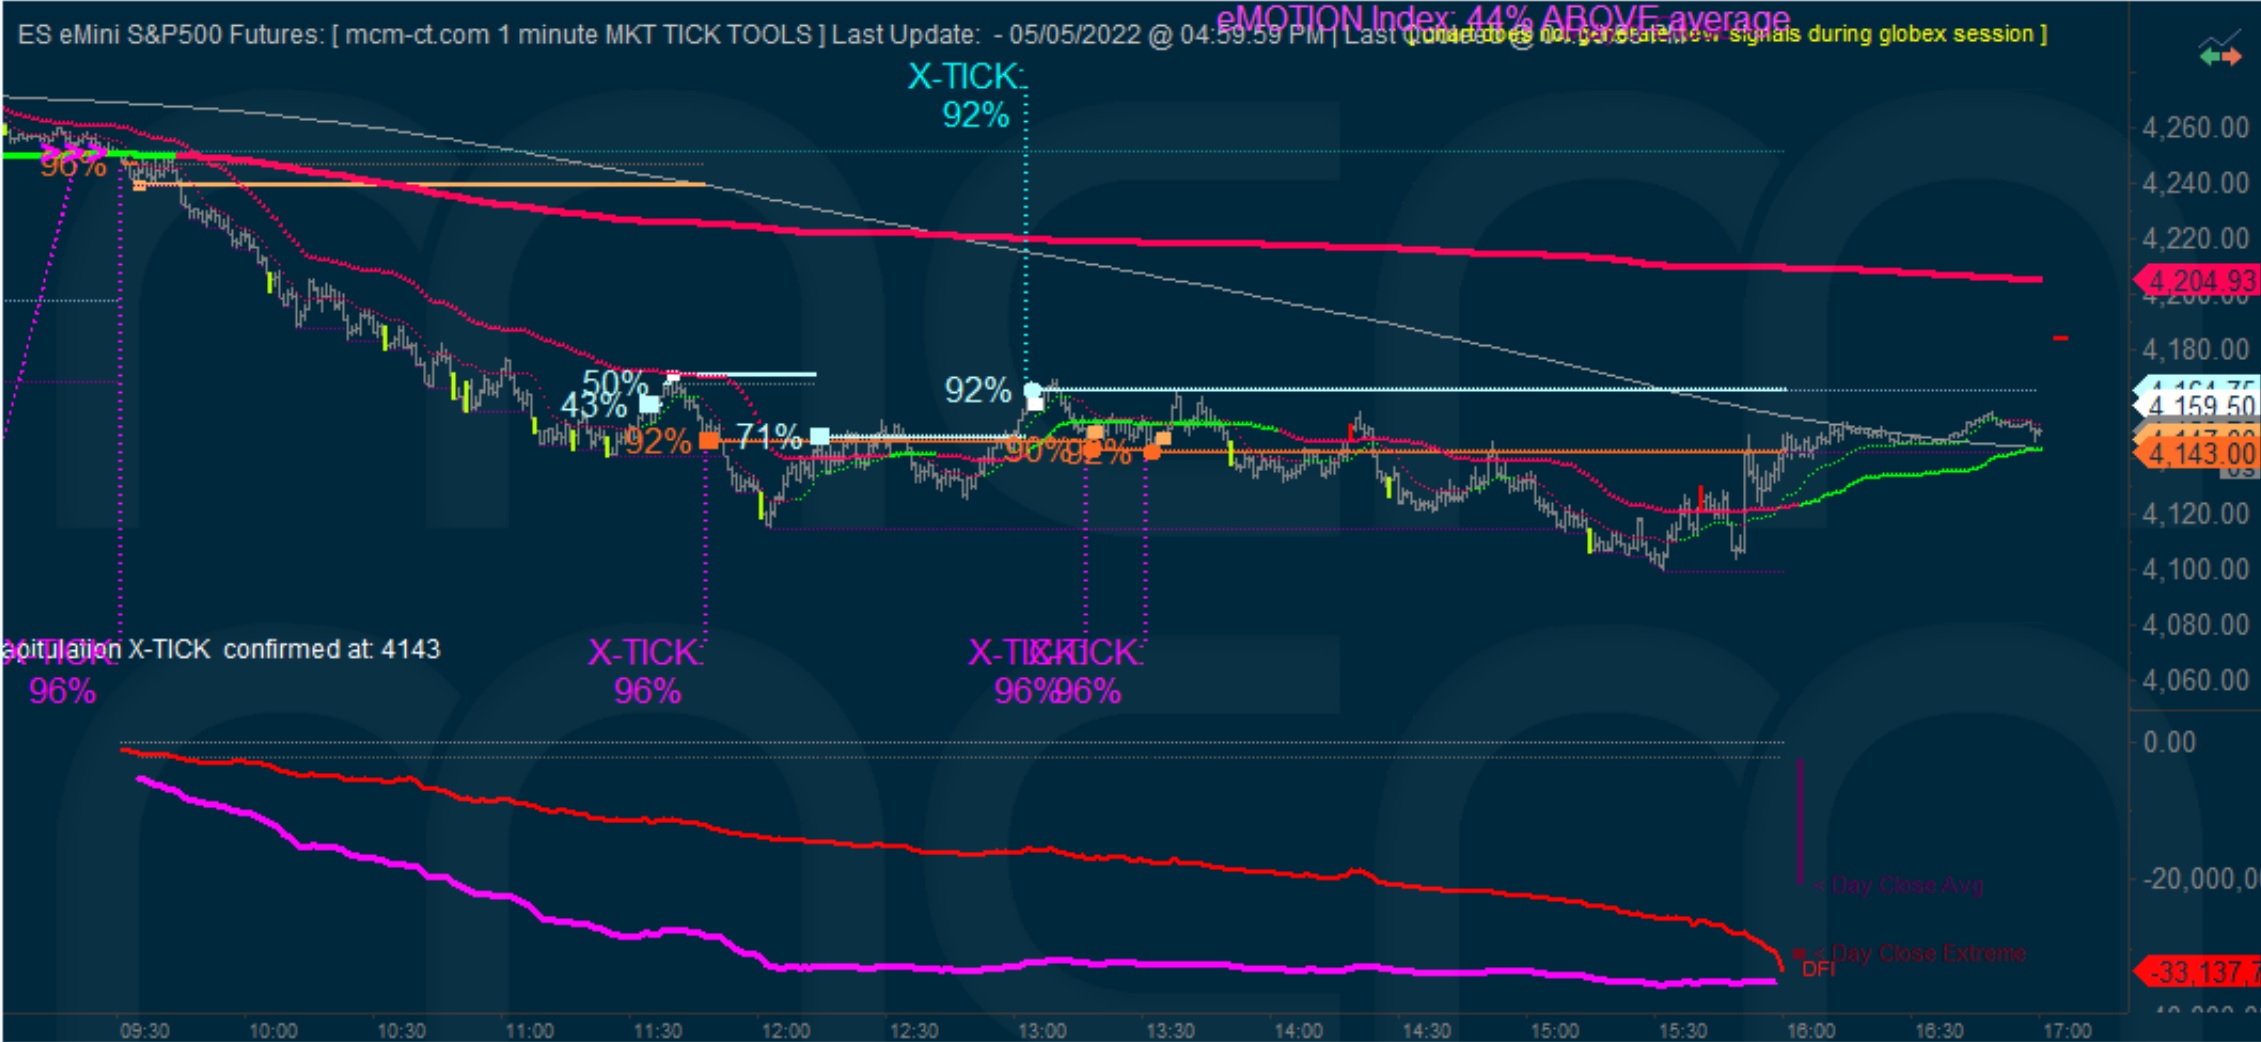
Example 4
Here we see again a nice example of a breakdown and huge move in the direction of the gap (continuation squeeze). Price was moving lower, we opened and triggered the SE Xtick, but the bounce off it was weak and could push above ML which was very close. Once the opening SE Xtick broke down, we flushed with no looking back. After nearly 100 points (!) during which momo capped price (super bearish trend when momo caps and price can't even get to danny), bulls finally tried a bounce, which was met with a double BE near danny that caused another flush of nearly 50 points. After that action started to be more whipsawy, but in the end bulls failed to hold above danny and we flushed once more to a new LOD, before putting in a bounce after the RTH close.